Saturday, December 31, 2011
Monday, December 26, 2011
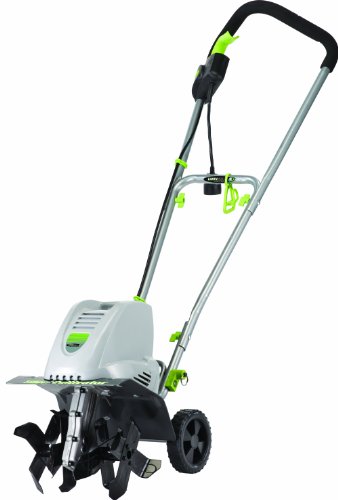
Earthwise TC70001 11-Inch 8-1/2 Amp Electric Tiller/Cultivator
!±8± Earthwise TC70001 11-Inch 8-1/2 Amp Electric Tiller/Cultivator
 | Price : $119.99
Post Date : Dec 26, 2011 04:13:06 | Usually ships in 24 hours
- Electric tiller cultivator
- 120 volt, 60 hertz and 8-1/2 ampere
- 11-inches cutting width
- 8-1/2-inches cutting depth
- Dual 4 blade steel tines
More Specification..!!
Earthwise TC70001 11-Inch 8-1/2 Amp Electric Tiller/Cultivator
Sunday, December 18, 2011
Troy-Bilt TB144 26cc 4-Cycle Gas-Powered Cultivator/Tiller with Edger Attachment Kit
!±8± Troy-Bilt TB144 26cc 4-Cycle Gas-Powered Cultivator/Tiller with Edger Attachment Kit

Rate :
| Price : | Post Date : Dec 18, 2011 12:30:30N/A
This newly designed 2-in-1 machine cultivates your garden AND makes a crisp bed edge. The versatile design means you can convert it quickly from a cultivator to an edger with no tools. Plus, it is lightweight for easy maneuvering. Thats why it is a favorite of gardeners with small vegetable, flower or herb gardens. Front bumper and border edger attachment included. 2-year limited warranty. U.S.A.
Coupon Lexmark X9575 E7 Elliptical This Instant Dyson Dc07 Upright Vacuum Coupon
Monday, December 12, 2011
T roy-Bilt Tiller Transmission Service Repair Manual for Troy Bilt Roto Tillers
Folding Stationary Exercise Bike Discount Order Bumbo Seat For Babies Shopping Smoke Alarms Kidde
Wednesday, December 7, 2011
Husqvarna DRT900H 17-Inch 160cc Honda GCV160 Rear Tine Dual Rotating Tiller (CARB Compliant)
!±8± Husqvarna DRT900H 17-Inch 160cc Honda GCV160 Rear Tine Dual Rotating Tiller (CARB Compliant)
 | Price : $849.95
Post Date : Dec 07, 2011 23:03:23 | Usually ships in 24 hours
- 17-Inch Tilling Width
- Honda 160cc Engine
- Easy-adjust drag bar, for balance in different working conditions
- Counterweight increases weight on the wheels to improve balance for safe and sturdy operation
- CARB Compliant
More Specification..!!
Husqvarna DRT900H 17-Inch 160cc Honda GCV160 Rear Tine Dual Rotating Tiller (CARB Compliant)
Saturday, December 3, 2011
Troy-Bilt Horse 20-Inch 305cc Briggs & Stratton 1450 Series Gas Powered Forward Rotating Tiller
!±8± Troy-Bilt Horse 20-Inch 305cc Briggs & Stratton 1450 Series Gas Powered Forward Rotating Tiller

Rate :
| Price : $1,799.00 | Post Date : Dec 03, 2011 19:48:05Usually ships in 1-2 business days
Wholesale Altimeter Watches Mouthpiece Sleep Apnea Clearance Sale Cheaper Frye Matilda Boot
Heirloom Tomatoes, Growing Them
What's an heirloom tomato? An heirloom tomato is a variety that is open pollinated, may be several hundred years old, generally passed down through generations, and although there may be some variety in the results because it is open pollinated, will consistently produce the same characteristics when planted from saved seed. This is unlike hybrid tomatoes which are generally F1 hybrids, meaning that in order to get consistent results, the seed needs to be from a specific cross and only those seeds from the cross are planted. If the seeds are saved from a hybrid tomato, the resulting plants will most likely not show consistency and will reproduce all the traits of their parents.
Just to clarify, hybrids are genetically modified but not "genetically modified" in the scary way of petri dishes and inserted genes. They are genetically modified through breeding. Breeding is also a form of genetic modification. The term genetically modified is bandied about and is thought only to refer to the mad scientist type of modification. There is nothing evil about hybrid tomatoes and if disease is a problem, say in the soil, hybrids can be grown that have specific disease resistance because it was bred into them.
I have a collection of 80 varieties of heirloom tomatoes from all over the world and I still have not collected all of the different types, color variations, bizarre growth habits, heat tolerance, cold tolerance, or from every country in the world. The tomato is the most widely grown vegetable/fruit in the world. There are so many different types, it would be nearly impossible to catalog them all. There would always be one more in an isolated valley which has been grown for centuries in Bolivia, China, Mexico, etc. Many think the tomato is an Italian development because it is highly featured in the Italian cuisine. Actually, it is a native of the Americas, Mexico to be exact where a few different species growing wild have been bred into the amazing multitude of varieties we have today.
Heirloom tomato growing is not any different than growing hybrids. They can be very productive, used for sauce, sandwiches, salad, fresh salsa, and canning. Choosing the ones to grow depend on taste preference, specific use, novelty, etc. There are red, pink, white, yellow, orange, purple, blue, green (they ripen greenish yellow), striped, splotched, scabby, two or more colors, round, beefsteak, small, tiny, cherry, grape, plum, huge, fuzzy, pleated, variegated foliage, twisted foliage, wilted looking foliage, potato leaf, regular leaf, and combinations of all these characteristics. The actual choice may be limited only by availability. Finding the heirloom tomatoes as ready to plant plants is often a very difficult task. I suggest searching the web for sources. Seed is often easier to find and for the price of a plant, there is often 30 seeds so the possibility of 30 plants. Tomato seed will stay viable for 10 years. I've had 7 year old seed germinate above 60 percent.
Buying heirloom tomato plants
So, you have found a variety that you wish to grow. You order the plants and they are shipped to you. Now what. Most sellers will send directions on how to help the plants overcome the shock of shipping. If not, open the box as soon as possible. If the plants are dry, water them with warm water. The plant can take up warm water quicker than cold water. If they are broken, make a clean cut where the break is. Cut away any damaged tissue on both the stem and the stem in the pot. Put the broken piece in a jar of warm water. Unless it is absolutely crispy from dehydration, it will recover, send out roots and can be potted up for another plant. This generally happens within 2 weeks. The potted portion will put out new growth. It depends where the break was as to how long it will take to send out new growth. If there is a leaf node (where the leaves are attached to the stem, with or without the leaf present), it will happen relatively quickly. If it has to send up a new stem from the base, that may take a month or so. After taking care of these first basics, put the plants in an area that gets bright light, but no sun. Full sun will burn and damage the plants because they are tender from being in a dark box. An artificial light set up, this is the best. They will recover faster if they are under lights because they are getting the spectrum and intensity of light they need without the chance of burning. The second day, put them in a sunny window for the morning hours, and then back to bright light for the afternoon. This can also be done outdoors if the weather is warm enough...above 50 degrees F. Make sure the plants don't dry out while this process is going on, especially if it is done outdoors and they are still in their pots. Then, the third day let them have morning sun and a few hours of afternoon sun and then back to bright light. The fourth day, they should be tough enough to handle full sun. If the danger of frost is past, this process can be done while they are in the ground. Provide shade in some way to replace moving them to bright light. If the plants arrive and they can't be planted outdoors because there is still a chance of frost, put them in the sunniest window available, hopefully a southern exposure. Too little light will cause the plants to grow lanky and weaker. They still can be planted but they need a little adjustment which I will discuss in the next section.
Site preparation
This is a relatively straight forward process but there are a few things which can be done to improve results. First, the site needs to be in full sun. Full sun is 6-8 hours of sun. Less than this and the plants will perform poorly. The site ideally should have room enough to plant the tomatoes with at least 2' space all around them, 3 is better. Second, prepare the site by tilling by machine or turning the soil and breaking it up with a spading fork. During this process, amendments can be added like lime, decomposed organic material such as composted garden waste, and decomposed manures. I don't like to spread fertilizer on the area because it will not only feed the tomatoes, it will feed the weeds. I'd rather put food in the planting hole so only the tomato gets fed. The soil should be worked but not overworked. Working in materials so they are mixed in is good, but if the soil is worked too much, say by a roto-tiller, it will destroy the structure and be more prone to compacting. This is especially important not to over work compaction prone clay soil. If all nature has given is clay, add gypsum and organic material to help improve the structure. Compost is the best material to add, either from garden waste or manures. The nutrients are readily available and no further decomposition is needed. The beginning of the season is not the time to add raw compost material like garden waste. Fall is a better time to add leaves, clippings, etc that have not been composted first. The decomposing bacteria that break down the matter need nitrogen and if there isn't enough in the material (such as stems, sticks, and fallen leaves) the bacteria will take nitrogen from the soil to the detriment of the plants which need it as well. Eventually the soil gets the nitrogen back when the bacteria die, but the plant suffers in the mean time. Something like animal manures can be added in the spring, but don't add it just before planting. Digging into it can be unpleasant and if it's something like poultry manure, it is very potent and can burn the plants. I prefer to add it a few weeks before planting to let it mellow a bit. It also has time to break down a little and will be ready to feed the plants and improve the soil structure at the time of planting. Be aware that adding fresh cow manure also adds weed seeds.
Applying lime. In order to have an idea about how much lime is needed, a pH test needs to be done. It measures the amount of acidity in the soil. They are available at garden centers and directions come with the kit. If the pH is below 6.8, lime needs to be added. Around 6.8 all the nutrients are most available to the tomatoes. A little above 6.8 and a lot of organic matter has been added, it would still be a good idea to add some lime because the organic matter can make the soil acidic. If the result is above 7.0, no lime is needed. Liming is especially important for tomatoes because they need calcium in the soil and lime adds calcium as well as the correct pH makes it more available. Without going into all the chemistry and formulas for calculating the exact amount of lime that needs to be added, apply it so the ground looks like it has had a dusting of snow. Work this in. Regular lime will not burn the plants and the best to get is dolomitic or Lee lime. This type of lime contains magnesium which is an important nutrient for plants. I don't recommend using hydrated lime. It is very caustic to handle and is harmful to the plants if it hasn't broken down before they come into contact with it. Liming the soil with powdered mineral lime every year if the pH is below 7.0 will not harm the plants.
Now it's time to plant. If the plants haven't been acclimated to growing outdoors by being outdoors (hardening off) they need to be. Gradually introduce them to outdoors like a plant that has been in a box for 3 days as mentioned previously. When they are ready it's time to plant. Some people have to have exactly straight rows, some don't. The tomato plant does not care. The only thing the tomato needs is space and room to grow so have the holes with at least 2' around them in whatever pattern that is preferred. Look at the tomato plant before the hole is dug. If the stem is particularly tall or seems weak, dig the hole much deeper to accommodate a lot of the stem. The stem will grow roots and the plant will be much stronger. This is especially important if the plants were started in the house and didn't get enough light and they are spindly. If very spindly, a trench can be dug and the stem carefully laid in it with the top above ground. Into the planting hole, slow release fertilizer or organic fertilizer can be put. I like to mix up a handful each of Sulpomag (available on the web), greensand, blood or cotton meal, bone meal, and a tablespoon or so of dolomitic lime. I mix it all together and add about a tablespoon to each planting hole. Place the tomato in the hole, add some water to the hole and then back fill. Water again. If cutworms are a problem in your area, take a little newspaper strip and wrap it several times around the stem to keep them from chewing into and hauling away the stem. By the time the plants are no longer vulnerable the paper will have rotted away. Continue planting in this way until all the plants are planted.
To stake or not to stake, that is the question.
Tomatoes do not need to be staked. They sprawl on the ground in the wild and ramble wherever they want. Commercially they are grown in fields and allowed to sprawl. There are some draw backs to this. First, it makes weeding, cultivating, and harvesting difficult. Second, it is easier for slugs and critters to eat into the tomatoes causing damage and allowing rots to get in. Staking and or growing the tomatoes in a cage has the distinct advantage of getting the fruit off the ground...out of easy reach of rodents and slugs. It also makes the crop easier to harvest. The vines are upright and it is easy to see and pick the fruit. Staking and growing in cages does add cost to the venture, but they can be used every year if they are stored out of the elements over the winter.
Stakes need to be at least 6' tall. As the heirloom tomato grows, the stem is loosely tied to the stake with cloth ribbon. I tear old clothes into strips about an inch wide and use this. Twine can be used but it tends to cut into the stems if the plant leans away from the stake because its fruit is heavy. Tie the stem to the stake every couple of feet of growth or at shorter intervals if the plant seems unstable.
Crotching. This is something done to the plants to encourage one main stem and therefore larger fruit. Little sprouts, which will become a stem, grow in the leaf axils...where the leaves meet the stem. These are removed, just dig them out with your thumb nail or break them off if they have gotten bigger than a sprout. A funny thing happened when I was looking at a French site on tomatoes. I can't read French so I used a web translator to translate it into English. It took me a few minutes to figure out what was meant by "digging the sprout out of the armpit"...crotching. One thing to note is to make sure the sprout is a stem and not flowers. It's best to let it grow a little bit so it can be identified until you get the knack of it.
Growing Heirloom tomatoes in cages.
This is the easier way to grow tomatoes. Just put the cage around the plant and let it grow. No, crotching is necessary because the cage will support all branches. Choose a cage with openings large enough to pick the tomatoes through the cage.
Common problems
Heirloom tomatoes are susceptible to major tomato diseases just like commercial varieties. Fungicides can be purchased to control early blight, the deadly late blight, and other spots. I prefer to use copper soap, an organic control. Follow the directions on the label.
Insectpests aren't generally a problem. I have seen aphids and flea beetles on my plants and I control them with neem oil and soap. Neem is available on the web. Be sure to get pure neem oil. Mix 1½ tsp of dish soap and an equal amount of neem oil to a quart of water. Apply with a sprayer. It kills on contact and also has a few days residual effect. Insects not contacted with the spray and do not feed on the plant are unaffected by the neem. Only those insects which feed on the sprayed plants are affected. Neem causes the insect to stop feeding and it can't reproduce nor young become adults. It shouldn't be applied in full sun and the mixed solution needs to be used immediately because water causes the active ingredients to break down. Neem is very safe to handle. It has many uses in its native India including as food. Neem also controls the plant disease powdery mildew.
Blossom end rot. This is a physiological problem characterized by a blackened area at the blossom end or the bottom of the tomato. It is not a disease but actually a calcium deficiency. Calcium gets into the plant with water. If there isn't enough water because of a drought, the calcium can't get into the plant and the deficiency develops. Make sure the plants always have ample water.
Cracking of fruit. This occurs when the plants have been growing on the dry side and then they receive a lot of water either from watering or rain. The fruit swells until it cracks. This can be avoided by consistent watering and mulching. Mulch material can be anything that covers the soil. Mulch fabric, straw, and newspaper are a few examples. The mulch conserves the water and a consistent supply is available to the plant.
Weeds. Unwanted plants need to be removed from the bed to reduce the competition for water and nutrients. Mulch can be used and it needs to be at least 3 inches thick to be a good barrier to weed growth. See cracking of fruit to get suggestions for types of mulch. Good ole fashion hand pulling for the bigger ones and a hoe for smaller ones. Do not let them get big enough to go to seed because they will become part of the seed reservoir in the soil and will be an increased problem in following years. Another way around weeds is to grow heirloom tomatoes in pots. The pots need to be at least 3 gals with good potting soil. The plants can be staked. The tomatoes can be more prone to cracking and blossom end rot when grown in pots so careful watering is advised.
Growing Heirloom Tomato Plants from Seed
The best way to start tomato plants is under artificial light. Florescent light fixtures with double bulbs can be used. The lamps on adjustable chains are the best because they can be raised or lowered to accommodate the plants' growth. The tomatoes get enough light if they are within 4 inches of the light.
If all that is available is window space, a south window is the best. They still will probably get leggy and lanky, but that can be dealt with at planting. Do not start tomatoes any earlier than 8 weeks before they go out. They just get too darn big if started earlier than that. The stress of being large, in the house, sets them back when they get planted. It's best to have smaller, sturdier plants which will grow quickly once planted.
I like to use 3 oz solo cups. I start 12 seeds per cup to conserve space. Don't sow any more than that because they will get crowded, compete too heavily and all will not be thrifty. Barely cover the seed with soil, keep warm and moist. Germination occurs over a couple of weeks. When the seeds are 3" high or so, divide them into groups of 3 and put them in their own community pots. Plant the seedlings half their height deeper than they were growing. If they were 3 inches tall, plant them one and a half inches deeper than they were previously growing. Let them grow on until their roots fill the cup. Just knock the root ball and look. If there are lots of roots in a tangle around the root ball, it's time to pot them up individually in their own 3 oz cup. Plant these with the bottom of the stem and roots touching the bottom of the cup, making the plant deeper in the pot again. They can stay in these cups until they are planted.
Bargain Sale Fisher Price Play Kitchens Promotions Sentry Home Safes Roc Face Creams Best
Tuesday, November 29, 2011
Saturday, November 26, 2011
Used Skid Steer Attachments
Skid steers, look like mini bulldozers or backhoes. They are incredibly versatile little machines that can do a variety of tasks on a construction, demolition or landscaping jobsite. Their small but very powerful, and most importantly maneuverable in tight spaces. Since each wheel or sometimes tracks have their own power-train, they can quite literally turn on a dime. They can do just about anything their larger cousins the bulldozer and backhoe can do, just in smaller sizes. As a matter of fact, they can do a lot more than those machines if you get the right attachment for them.
It's quite amazing actually, how many different attachments are for skid steers and bobcats on the market. There Bale handler's, beach cleaners, box graders, brush movers, brush breaks, buckets, cement mixtures, cold planners, dozer blades, forestry mulcher's, log splitters, landscape rakes, hitches, Harley rakes, grapples, material spreaders, compactors, sand baggars, snow removers, rototiller's, log splitters, trench compactors, trenchers, vibration rollers, tree shears, and winches.and the, that's not even a complete list
I think you can see why, these machines have become one of the most popular tools to have on a construction site, demolition site, or landscaping job. No matter what job you have to do, chances are there's a skid steer attachment that can make it easier. Even though these attachments can be a little expensive the solution to that is pretty obvious. Simply shop around a bit for used attachment. The Internet is a great place to be doing that, as there are plenty more sellers online then you'll find in your own geographical area.
You have to pay a little more care when shopping online, as there are no guarantees you get exactly what you want. But, with a little due diligence you can stack the odds in your favor of finding the perfect attachment for your skid steer. Whenever possible, get plenty of pictures and videos from the seller. Don't be afraid to ask. As well, ask plenty of questions regarding the items usage, and if possible get some maintenance logs. The fact they have logs in the first place is good news, and makes a strong case for a well cared for attachment.
Wednesday, November 23, 2011
Garden Structures
Nothing reminds us that spring is coming more than digging out the potting soil, the rusted tools, and clay pots. For me it involves cleaning the refuse out of my vegetable garden from the previous year, opening up the deer fencing, and bringing on the roto-tiller. Like many things in life, the process is often more important than the final product. In the end, after planting watering and tending, dozens of vegetable plants and seeds over the course of the summer, if the bugs, the weeds, and the weather let us have a few to ourselves we are truly happy.
A few years back I had a most unusual request come across my table. A husband and wife who are friends of mine had 2 different needs. She wanted a potting shed. He wanted a wood shed. Neither of them wanted to clutter their bucolic setting with too many little outbuildings. Our solution was to combine the two functions.
Their home and farm is located in a beautiful hamlet with a carpenter gothic church and many homes dating from the 1800s or before. The edifice they ask me to design was to define the line between her space-the flower garden and his space-the barn. The barn area was often quite busy and chaotic with his potato crop, and farm equipment. Her garden was equally in flux with new designs and beautiful assortments of flowers and fauna. With my friends help, I designed a carpenter gothic, potting and wood shed. From the barn you see the wood shed; from the house you see the garden and a potting shed. He can walk through the middle of the potting shed to reach the wood on a cold winters evening. She can easily reach her tools in the potting shed from the garden. I particularly love the fact that a small building I designed has joined this hamlet as a working participant of farm and home life.
I think many of us have forgotten how powerful a modest structure can be in the landscape. Eighteenth and nineteenth century southern plantations almost always kept their pigeons or doves in pigeonniers or dovecotes. These small structures were utilitarian, but punctuated and emphasized the larger structures they were near. We design tool sheds, potting sheds, and generator enclosures (and all other buildings) to fit in with their environment and to complement the existing architecture. Garden structures create the feeling of a compound even though as buildings they themselves are quite modest. Because their presence in the landscape can enhance all else, their design deserves just as much attention as their larger cousins.
To view photos associated with this article, please go to:
http://blog.crisparchitects.com/2009/03/garden-structures/
Saturday, November 19, 2011
Troy-Bilt GC720R Trimmer Plus Adjustable Garden Cultivator/Tiller Attachment
!±8± Troy-Bilt GC720R Trimmer Plus Adjustable Garden Cultivator/Tiller Attachment
 | Price : $89.99
Post Date : Nov 20, 2011 00:37:03 | Usually ships in 24 hours
This Troy-Bilt cultivator attaches to Troy-Bilt string trimmers (Item#s 263192, 170546 and 170547) without tools.
More Specification..!!
T3 Straightener Save You Money! Purchasing Bagged Hoover Redmax Weedeater Cheap
Tuesday, November 15, 2011
Putting the World of Finger Rehab Into Your Own Hands - What You Need to Know!
If you found this article, I'm going to presume that you have recently suffered an injury to one or more of your fingers. I will also assume you've been searching the internet looking for information on how to best expedite the healing process. That is exactly what happened to me. I can only hope that you found this article before wasting 40+ hours scouring the net only to come up empty or more confused than before. That also, is what happened to me. Only I believe I spent more time than 40 hours. And ended up more confused. My aim in this article is to rectify that.
Before I get into the results of my finger rehab search, let me give you a little background on the injury I suffered. It happened while helping my future mother in law roto-till the garden. Before you get squeamish, nothing happened with the roto-tiller. It happened when I sat down in a chaise lounge chair to put on my work boots. The chair had a design flaw that caused the legs to sever the top half inch of my left index finger. As a professional magician, that's an important half inch!
The doctors were not able to save the whole tip due to a crushed bone, so they did their best to attach a somewhat risky graft in the hopes that some of the tissue would regenerate. Then they sent me on my way with zero information on what to do next.
That is what led me to where you might be now. You may have suffered from a fracture, surgery to repair a trigger or mallet finger or maybe just a severe sprain. Whatever happened, just like me you figured the internet would provide you with a program that your doctor did not supply. Maybe your injury didn't even require a doctor's visit, and you just want to know what to do to get back to whatever it was that may have put you into this position in the first place. Personally, I don't think I will ever go back to gardening work.
So, first things first. Let's look at what you have to deal with in order to get healthy fast. I have broken it down into just a few categories. There is more to it, but these are the basics that should get you started.
Pain Management Reducing Swelling Flexibility and Strength
Additionally, if you have had surgery or stitches, this is the first thing you will have to attend to. I will include that under that category of pain management since I happen to know firsthand (pun intended) that surgery and stitches can be quite painful.
If you've had stitches, then I cannot emphasize enough that you should keep that would clean and be generous with the anti-biotic ointment. My doctor told me to redress the wound once a day. I did it three or four times. The other advantage to frequent redressing of a stitched area is that it gives you the opportunity to give that joint some movement. Too often we tightly wrap an injury only to forget to relieve the compression occasionally to let blood flow in and carry out toxins. Also, you want movement as soon as possible to the surrounding joint so that it doesn't start to freeze in a rigid position. At first, I waited too long to flex the finger joints and it was pretty painful to get that flexibility back. And when I say I waited too long, I'm only talking about a few days. Atrophy can set in quite swiftly.
The other thing to remember if you've had stitches, is that some of the physical therapy recommendations will have to wait a bit until the wound is completely closed. This can vary from person to person, but for the most part 1 to 2 weeks should do it. All that means is , DON'T PUSH IT! Not just yet anyway. You can flex your finger, but please don't pop any stitches.
Pain management is important because you will never use the afflicted finger, let alone exercise it, if every movement causes great pain. Swelling will be a major part of that pain, which we will address in a moment. If you've had stitches, then you also have the pain associated with having an open wound. Additionally, a fracture will have the broken bone to contend with. These can be addressed with your basic pain killer. Whether you prefer Ibuprofen, Acetaminophen, Naproxen or plain old aspirin, be sure to take it. This will be your best friend for the first few days.
Also, I highly recommend something that will seem simple, but will be hard to accomplish. Isolation. The majority of the setbacks I suffered were die to bumping and jamming my injured finger. What you don't realize until you've suffered an injury, is that due to lack of flexibility in your freshly wounded digit, it will bump into almost everything. What happens in your normal life is that your senses work in conjunction with your limbs to keep you safe. They are always on the lookout for protuberances that may harm you.
For example, your eyes can sense just how wide a doorway is, and will adjust your path so that you don't run into the door jamb. If it is an automatic door, your body will adjust your speed so that you don't run into the glass. When the brain is sent the information, the body will adjust to prevent injury.
However, if your finger no longer bends to the same degree it used to, even though the brain sends out the signal, the finger is unable to respond and pull itself out of the way. This would happen to me while driving. Turning the steering wheel, I didn't realize that my fingers would slightly curl so as not to hit the wind shield wiper or turn signal stalk. After the injury, I hit them every time I made a turn. Pretty soon, I felt like I could only go somewhere if I could drive in a straight line. Once I understood what was happening, I made the adjustment and ended the problem. So, be aware, and be sure to isolate your finger.
Now here is some information that is not new. I'm going to tell you that what grandma did still works best. R.I.C.E. Rest, ice, compression and elevation. Rest is kind of self explanatory. If you've hurt yourself rock climbing, it might not be a bad idea to take a few days off. Ice, compression and elevation are used mostly to deal with the swelling that accompanies an injury to one of your fingers. For some reason God only knows, it seems that the amount of swelling that goes with an injury is about four times higher than the amount really needed.
To deal with this, ice frequently. Do not put ice directly on the skin. First, it can damage tissue, and second, you won't be able to stand it for very long which will cheat you of the benefits of the therapy. You want multiple 15 to 20 minute sessions throughout the day. I know this is boring and inconvenient, but this will help you heal fast.
I had great success with cool water therapy. You cannot use this if you've had stitches until the wound is sealed, but this worked very well for me. The great thing about cool water treatment is that you withstand long sessions. Perfect if your daily life won't let you stick your hand in ice every 15 minutes. Just cool some water to about 60 degrees. I put some in a bowl that I kept next to the computer. Then.. stick your hand into it. I would keep it there for at least thirty minutes, maybe more. Your body adjusts to the temperature in about a minute or so, and soon you won't even notice you are soaking.
I also made improvement with alternating warm and cool water therapy. This is simple to do. Two bowls, one with 60 degree water and the other with 115 degree water. Alternate bowls for 5 or 10 minutes sessions.
Finally, you need to start rebuilding strength and flexibility in the injured finger. This is easy to neglect. After a while, you can get used to not using that injured finger and pretty soon, it will be extremely difficult to eliminate the stiffness. Be aggressive here. Constantly work the muscles. There are some great devices out there that can help. I've made video reviews of some of my favorites which I am posting on my web site. Even though these things work well, I have found that a few rubber bands, some squeeze balls and a deck of playing cards can be great therapy tools.
A reminder here. You will recover much faster if you remember to include extension exercises in your regimen. Most devices for sale only focus on flexion of the finger, the closing of the fingers or hand. This can build a muscle imbalance that will hinder your recovery. Be sure to work the extensor muscles as frequently as the flexors. This can be done with a rubber band around two fingers and forcing them to spread apart. Work with progressively thicker bands as you build strength. If you are really ambitious, you can grab one of those green bands they use at the grocery store to wrap vegetables.
Well, that's the basics. I hope they help. Of course there is a lot more that you can do for proper finger rehab, but it cannot be covered in one article. In the future, I will address some of the odd exercises I've come up with that were of tremendous benefit. Most of the stuff you can find on line works OK. It's just that they are boring and that means you will forget to do them. Using my profession as a magician, I found magic tricks that simulated those exercises, but they were much more fun to do and therefore, more likely to get done.
That will be the subject of a future article. Till then, you can always reach me at patrick@fingerrehab.com
Thanks.
Wednesday, November 9, 2011
Planting Grass Seed in the Fall
Planting grass seed in the fall is the best time to plant cool-season grasses or over-seed warm-season grass with perennial rye grass. If north of the transitional zone of the U.S., the best time to plant grass seed will be between August 25th and October 5th. If located in the warmer south and over-seeding, grass seed is best established when planted between September 20th and October 25th.
Soil quality and preparation are important steps in planting a new lawn. Begin by removing the existing vegetation. If planting a new lawn in a large area where there are lots of weeds, spray them with a non-selective herbicide like Round-Up to save hours of physical labor. If over-seeding, you're obviously will not want to kill your base grass with a herbicide application but what you can do is mow down your warm-season grass as low as you can. This along with verti-cutting and power raking, will reduce thatch and improve good seed contact to the soil.
At this point you will want to add the necessary fertilizer and any soil amendments that the ground may need. What and how much you need to apply can be determined by taking a representative soil sample and sending it off for analysis. Your local university extension office should be equipped to analyze and interpret your soil sample. You want to uniformly incorporate the grass fertilizer and soil amendments into the top 2 to 3 inches of top soil. The best way to achieve good incorporation is by using a good roto-tiller. For over-seeding projects, add 5 lbs per 1,000 square feet of a 16-20-0 analysis fertilizer two weeks after planting.
For a new lawn, you then want to level the soil as best as possible. The new soil needs to settle naturally, or you can speed up the process by adding more water. If water is added, wait for the soil to dry and then pull out any weeds that germinate. Then rake the soil so it has small groves in it. At this point you soil is now ready for planting grass seed.
For both a new lawn and over-seeding, apply 1/2 of grass seed in one direction on the soil using a spreader. Then put the other 1/2 of the seed in the other direction. Lightly rake the seed in and then roll the soil lightly with a roller. To achieve good seed to soil contact and maintain good soil moisture, top dress the grass seed with a thin layer of mulch or compost. This is not necessary but will improve grass seed germination, especially if under pressure from hot weather or drying winds blowing across the soil surface.
If sod is installed, repeat the same steps from above and make sure the soil is firm enough that the grass sod will not sink in after it is walked on. After sod is installed, roll it with a roller in two directions and water it twice a day until it roots. When grass sod can no longer be picked up by grasping it with your hand, it is rooted.
Monday, October 31, 2011
Mantis 7225-00-02 2-Cycle Gas-Powered Tiller/Cultivator (CARB Compliant)
!±8±Mantis 7225-00-02 2-Cycle Gas-Powered Tiller/Cultivator (CARB Compliant)
Brand : MantisRate :
Price : $304.16
Post Date : Oct 31, 2011 02:00:39
Usually ships in 24 hours
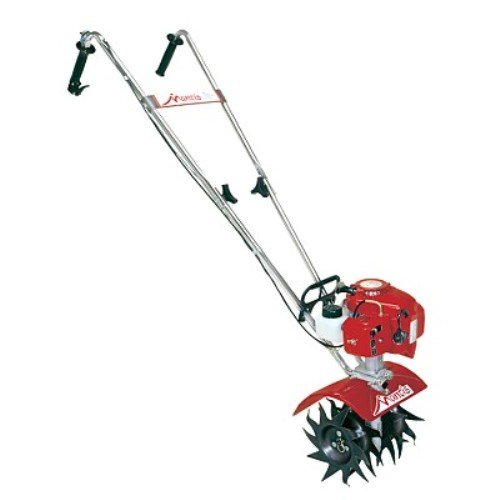
Cultivates close to plants without disturbing roots; works great in narrow rows. Tines reverse for shallow cultivating top soil. Cushioned shock-absorbing grips for comfortable operation. One-piece, die-cast gearbox. Speed control and shutoff switch. Primer pump for fast, easy starts. Includes free border/edger kit. Includes border edge attachment. U.S.A.
Sunday, October 23, 2011
Thursday, October 20, 2011
Wednesday, October 19, 2011
|
|
|
|
|
 |
 |
 |
 |
 |
 |
 |
 |